How to set up a static IP address?
Last updated on December 23rd, 2022 in General
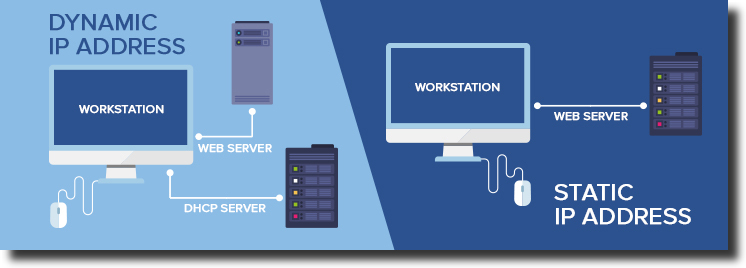 A static IP address is an IP address that never changes. It’s a permanent, unique address that identifies a device on a network. Most people have dynamic IP addresses, which can change from time to time and are not necessarily unique.
For some people, having a static IP address is important. For example, if you run a website, you’ll need to use a static IP address so people can always find your site.
Or if you have certain types of equipment that need to be able to connect to each other, you’ll also need to use static IP addresses.
If you need to set up a static IP address on your computer or another device, the process is usually not too difficult. In this article, we’ll walk you through the steps of how to do it.
Table of contents
A static IP address is a permanent, unique address that is assigned to a single computer or another device. It is not possible to change a static IP address without contacting your Internet service provider (ISP).
Static IP addresses are useful for servers and other devices that need to be accessible at all times. They can also be used to improve the speed and reliability of certain types of Internet connections.
A static IP address is an IP address that is assigned to a device or computer and does not change. Static IP addresses are useful for businesses and individuals who need to access their devices or computers remotely, or who need to run a server on their network.
There are several reasons why you might want a static IP address:
-Remote Access: If you need to access your computer or device remotely, you will need a static IP address. Without a static IP address, your device’s IP address could change, and you would no longer be able to connect to it.
-Running a Server: If you want to run a server on your network, you will need a static IP address. A server needs a static IP address so that clients can connect to it reliably.
-Security: Static IP addresses can be more secure than dynamic IP addresses. If your device has a static IP address, it is less likely to be hacked, because hackers will not be able to track it down as easily.
-Ease of Use: Static IP addresses are easier to use than dynamic IP addresses. With a dynamic IP address, you never know when it will change, which can be frustrating. A static IP address eliminates this problem.
 If you want to set up a static IP address in Windows, there are a few things you’ll need to do.
First, you’ll need to find out what your current IP address is. You can do this by opening the Command Prompt and typing “ipconfig.” Once you have your current IP address, you’ll need to find out what the default gateway is.
This is usually the router’s IP address. You can find this information in the router’s manual or online.
Once you have your current IP address and the default gateway, you’ll need to open the Control Panel and go to Network and Sharing Center. From here, click on Change adapter settings. Find the network adapter that you’re using and right-click on it. Select Properties from the menu.
In the Properties window, select Internet Protocol Version 4 (TCP/IPv4) and click on Properties again. In the next window, select Use the following IP address and enter your desired static IP address.
Make sure to also enter the subnet mask and default gateway. Once you’ve entered all of this information, click OK and close any other open windows.
Your static IP address should now be set up!
 Assuming you’re using a Mac, the process for setting a static IP address is different than it is on Windows. Here’s how to set a static IP address in macOS:
1. Open System Preferences and click on Network.
2. Select the network interface you want to configure from the left side of the window (typically Wi-Fi or Ethernet).
3. Click the “Configure IPv4” drop-down menu and select “Manually.”
4. Enter the desired IP address, subnet mask, and router address in the corresponding fields.
5. Click OK to save your changes.
 Assuming you have a static IP address and want to configure a Linux machine to use it, the process is actually quite simple. You’ll just need to edit a configuration file and then restart your network interface.
First, open up the file /etc/network/interfaces in your favorite text editor. You’ll see a section that looks like this:
iface eth0 inet dhcp
This is telling the system to configure eth0 (your first Ethernet interface) using DHCP (dynamic IP addresses). We want to change it to look like this:
iface eth0 inet static address 192.168.1.5 netmask 255.255.255.0 gateway 192.168.1.1 dns-nameservers 8 .8 .8 .8 4 .4 .4 .4
Be sure to replace the IP addresses with the ones appropriate for your network. The address and gateway are your static IP address and router, respectively. The netmask should be the same for everyone on your network (unless you’re on a really large network).
And finally, the DNS servers are Google’s public DNS servers (but you can use any DNS servers you want).
Once you’ve made those changes, save the file and exit your text editor. Then, all you have to do is restart your network interface with this command: sudo ifdown eth0 && sudo ifup eth0
And that’s it!
 If you need to set up a static IP address for your iOS device, follow these steps:
1. Go to Settings > Wi-Fi.
2. Tap the i next to the Wi-Fi network that you want to configure.
3. Tap Static under IP Address.
4. Enter the static IP address information, then tap Done.

If you want to set up a static IP address in Android, there are a few things you need to know first. Here’s a step-by-step guide:
1. To start, you need to know what your current IP address is. You can find this by going to Settings > About Phone > Status. Your IP address will be listed under “IP Address”.
2. Next, you’ll need to find out what the subnet mask and gateway are for your network. These can usually be found in your router’s documentation or online support forums.
3. Once you have this information, open up the Settings app on your Android device and go to Wireless & Networks > Advanced > Static IP settings.
4. Enter the IP address, subnet mask, and gateway that you gathered earlier into the appropriate fields. Then, select “Save” to apply your changes.
5. That’s it! You should now have a static IP address configured on your Android device.
 If you want to set up a static IP address on your router, the first thing you need to do is find out what the IP address, subnet mask, and default gateway are for your router.
You can do this by logging into your router’s web interface and looking for these settings under the “Network” or “IP Address” section.
Once you have these three pieces of information, you’ll need to enter them into your router’s static IP configuration page.
The next step is to find out what the DNS servers are for your network. You can usually find this information in your router’s web interface as well. Once you have the DNS server addresses, you’ll need to enter them into your computer’s network settings.
After that, you should be able to connect to your router using the static IP address you configured.
It’s important to know your static IP address to be able to configure SmartDNS as well.
If you’re looking to set up a static IP address, there are a few things you’ll need to do.
First, you’ll need to find out what your current IP address is and then choose an IP address that you want to use.
Once you have your chosen IP address, you’ll need to contact your ISP and have them make the changes for you.
Finally, once the changes have been made, you’ll need to log into your router and change the settings so that your static IP address is used. With a little bit of effort, setting up a static IP address is relatively easy and can be extremely beneficial if you want to access certain services or applications remotely.